VivaCut
Screenshots
VivaCut is a professional-grade video editing application designed specifically for Android users. It offers a powerful suite of tools that allows both beginners and experts to create high-quality cinematic content directly from their smartphones. Whether you want to make short clips for social media or detailed montages, this app provides the flexibility you need.
The application stands out because it combines a user-friendly interface with advanced features usually found in desktop software. You can easily manage complex projects using a multi-layer timeline and precise editing controls. Because it is optimized for mobile performance, it ensures a smooth creative process from the first cut to the final export.
How To Download And Install VivaCut APK For Android
System Requirements
Before you begin, ensure your Android device is ready. The app performs best on modern hardware.
- Operating System: Android 7.0 or higher is recommended.
- Storage Space: You need at least 250 MB of free space for the file.
- RAM: At least 4 GB of RAM ensures smooth editing.
Step 1: Enable Unknown Sources
Your Android blocks apps from unknown sources by default. You need to change this setting.
Here is how to do it:
- Open your Settings app.
- Tap on Security or Privacy.
- Find Install unknown apps.
- Select your browser or file manager.
- Toggle on Allow from this source.
Alternatively, search for “Unknown sources” in Settings. Enable the option directly. This action permits APK installation.
Step 2: Download the VivaCut APK
Now, Download the APK file. Use your mobile browser.
- Visit Filetomob.com.
- Type “VivaCut APK Download” in the search bar.
- Look for the official app icon (purple and white).
- Navigate to the app page.
- Check the version number.
- Click the download APK button.
Tap the download button. Wait for the file to finish. You will see a notification once it is complete.
Step 3: Locate the Downloaded File
After downloading, find the APK. You can do this in two ways:
- Swipe down your notification bar. Tap the downloaded file directly.
- Or, open your Files or My Files app. Go to the Downloads folder.
The file name will end with “.apk”. Tap on it to begin.
Step 4: Install VivaCut on Your Android
The installation process is straightforward.
- Tap the APK file.
- A pop-up window will appear. Press Install.
- The system will scan the package. This takes a few seconds.
- Finally, hit Open or Done.
If a warning about “Blocked by Play Protect” shows up, tap Install anyway. This is normal for external APKs.
Step 5: Open and Set Up the App
You have successfully installed VivaCut. Launch the app to start editing.
- Grant necessary permissions (storage, microphone, camera).
- Skip any introductory tutorials if you are in a hurry.
- Sign in with your email or social account for cloud features.
Now, you can create stunning videos. Use transitions, keyframes, and green screen effects.
Troubleshooting Common Issues
Sometimes, the installation fails. Do not worry. Here are quick fixes.
Problem: “App not installed” error
- Solution: Free up storage space. Then, delete the old APK and redownload it.
Problem: Parsing error
- Solution: The APK is corrupt or incompatible with your Android version. Download a different version.
Problem: App crashes on launch
- Solution: Clear the app cache. Go to Settings > Apps > VivaCut > Storage > Clear Cache.
Tips for a Successful Installation
To avoid errors during the process, keep these suggestions in mind:
- Check Storage Space: Ensure you have at least 100MB of free space before downloading.
- Verify Android Version: VivaCut performs best on Android 5.0 or higher.
- Disable Antivirus Temporarily: Sometimes security apps block APK files by mistake.
- Use a Stable Connection: A weak Wi-Fi signal can result in a corrupted file.
VivaCut – Pro Video Editor Key Professional Features
VivaCut for Android transforms your smartphone into a professional editing suite. While many apps offer basic trimming, VivaCut provides high-end tools usually reserved for desktop software. If you want to elevate your social media content or short films, here is why this app stands out.
Multi-Layer Timeline for Complex Storytelling
The heart of VivaCut is its Multi-Layer Timeline. Unlike simple editors that force you into a single track, VivaCut lets you stack multiple elements simultaneously.
- Video Overlays: Place clips on top of each other to create “picture-in-picture” effects.
- Audio Depth: Layer background music, sound effects, and voiceovers for a rich soundscape.
- Text Integration: Add titles and subtitles that interact with your visual layers.
This non-linear editing style allows for intricate storytelling. You can manage every element independently, ensuring your timing is frame-accurate.
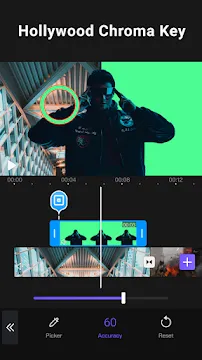
Cinematic Chroma Key (Green Screen)
The Chroma Key tool is a game-changer for creators who want to transcend their physical surroundings. It allows you to remove specific colors—usually green or blue—from your footage.
Once you remove the background, you can swap it for a digital landscape, an abstract pattern, or a cinematic city scene. This feature enables you to create Hollywood-style visual effects without a massive budget. It is perfect for gaming videos, creative skits, and immersive tutorials.
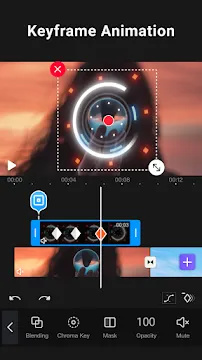
Precision Keyframe Animation
Keyframe Animation represents the pinnacle of mobile editing control. This “Pro” feature lets you define specific points in time to change an object’s properties.
- Custom Movement: Make an image or text block glide across the screen along a specific path.
- Scaling: Create smooth zoom-ins or zoom-outs on specific details.
- Transparency: Fade elements in and out with surgical precision.
By setting start and end points, the app automatically calculates the motion between them. This results in fluid, professional-grade animations that look hand-crafted.
Advanced Masking and Blending
VivaCut offers sophisticated Masking and Blending tools to merge different visual worlds. These tools allow you to hide or reveal parts of a video layer with total control.
- Linear & Mirror Masks: Use these to create “clone” effects or split-screen transitions.
- Radial Masks: Focus the viewer’s eye on a specific circular area while blurring or darkening the edges.
- Double Exposures: Use blending modes like “Screen” or “Overlay” to merge two clips into one artistic image.
These features are essential for creating seamless transitions that keep your audience engaged.
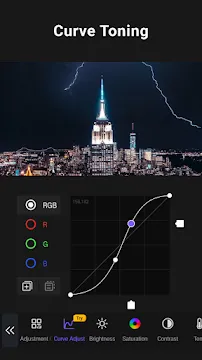
Professional Color Tuning
Great lighting isn’t always possible during a shoot, but Professional Color Tuning fixes that in post-production. VivaCut goes beyond simple filters by offering deep technical adjustments.
Curve Toning
Adjust the brightness and contrast of your footage using a tonal curve. This allows you to lift shadows or crush highlights without ruining the overall image quality.
RGB Channel Adjustments
You can manipulate Red, Green, and Blue channels individually. This level of control is vital for high-end color grading. It helps you achieve a specific “mood”—whether that is a cold, blue thriller vibe or a warm, golden-hour aesthetic.
By utilizing these professional features, you turn raw mobile footage into polished, cinematic content.
Music Marker for Rhythmic Editing
Creating a video that perfectly matches the beat of a song can be difficult on a small screen. The Music Marker simplifies this process by allowing you to “tap” along to the rhythm.
- Visual Cues: The app places marks on the audio track at every beat you select.
- Perfect Timing: You can snap your clips, transitions, and effects directly to these markers.
- Dynamic Flow: This ensures your cuts are always in sync, creating a high-energy viewing experience that feels professional.
Using this tool helps you avoid “sliding” edits and ensures your visuals hit exactly when the bass drops.
Advanced Audio Extraction and Manipulation
A great video is nothing without great sound. VivaCut provides desktop-level Audio Extraction and mixing capabilities directly within the app.
- Extract from Video: You can pull the audio track from any video in your gallery to use as background music or a sound bite.
- Independent Track Control: Manage multiple audio layers simultaneously. Adjust the volume, fade-ins, and fade-outs for each track separately.
- Spatial Positioning: Fine-tune where the sound sits in the mix, allowing you to balance voiceovers against loud background music.
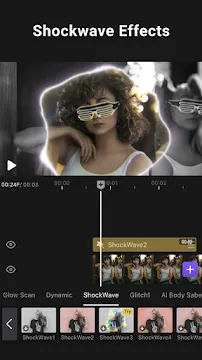
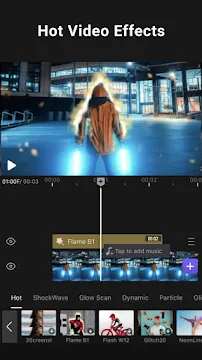
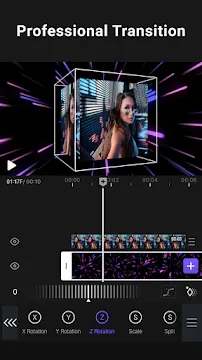
Cinematic VFX and Glitch Effects
VivaCut includes a massive library of over 300+ VFX and Transitions. These are not just basic filters; they are designed to emulate professional film production techniques.
- VHS & Retro Styles: Add a nostalgic, analog feel to your footage with Grainy and VHS overlays.
- Glitch & RGB: Create modern, edgy looks using “Trippy” effects and digital distortions.
- Seamless Transitions: Move between scenes using cinematic wipes, zooms, and spins that feel fluid rather than jarring.
These effects are updated regularly, allowing you to stay ahead of social media trends while maintaining a high production value.
High-Resolution 4K Export
Many mobile editors compress your video, leading to a loss in quality. VivaCut respects your hard work by offering Ultra HD 4K Export.
Whether you are uploading to YouTube or showing your work on a large screen, your video will remain crisp and clear. You can also customize the resolution and frame rate to meet the specific requirements of different platforms. This ensures your content looks professional regardless of where it is viewed.
Speed Control for Time Manipulation
The Speed Control feature allows you to alter the flow of time within your project. This is a vital tool for emphasize specific moments or creating a certain mood.
- Slow Motion: Smooth out fast-moving action to reveal hidden details.
- Fast Motion: Speed up longer processes, like a sunset or a painting, to create engaging time-lapses.
By varying the speed of different clips, you can control the “energy” of your video, making it more engaging for your audience.
VivaCut – Pro Video Editor User Interface & Experience on Android
VivaCut is a professional-grade video editor designed for Android users. It offers a sophisticated workspace that rivals many desktop programs. The app focuses on multi-layer editing and cinematic visual effects.
User Interface & Experience
The VivaCut interface is sleek and modern. It uses a multi-layer timeline that allows you to stack videos, images, and music. This layout feels familiar to anyone who has used creative software.
- Drag-and-Drop: You can move clips easily with your finger.
- Intuitive Icons: Most tools are represented by clear, logical icons.
- Real-time Preview: You can see your edits immediately in the top window.
Transitions and effects are just a tap away. The app uses a bottom navigation bar to keep the most important tools within reach.
VivaCut vs. Desktop Editors
Comparing VivaCut to Adobe Premiere Pro or DaVinci Resolve reveals interesting differences. Desktop editors offer deeper technical control over color grading and file management. However, VivaCut excels at speed and social media trends.
- Complexity: Premiere Pro and DaVinci have steep learning curves. VivaCut simplifies complex tasks like Chroma Keying (Green Screen).
- Mobility: You can edit a high-quality video on a bus using VivaCut. Desktop editors require a powerful workstation and a desk.
- Built-in Assets: VivaCut provides a massive library of stickers, music, and VFX. On desktop, you often have to source these files manually.
While it lacks the heavy-duty rendering power of a PC, VivaCut is more efficient for vertical content and quick turnarounds.
Beginner-Friendly? The Learning Curve
VivaCut is very accessible for newcomers. Most users can create their first video in under ten minutes.
For Total Beginners
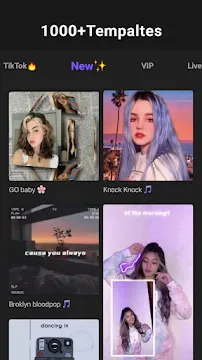
The app provides templates that do the hard work for you. You just pick your clips, and the app applies the timing and effects. This feature removes the fear of a blank timeline.
For Advanced Users
The learning curve appears when you dive into Keyframe Animation and Bézier Curves. These tools require patience to master. Fortunately, the app includes “Guided” modes to help you learn these professional techniques.
Performance Across Devices
The performance of VivaCut depends heavily on your Android hardware.
- Flagship Devices: Phones like the S26 Ultra or Pixel 10 Pro handle 4K exports smoothly. Scrubbing through the timeline is instant, even with multiple 4K layers.
- Mid-Range Devices: Phones like the Galaxy A57 or OnePlus Nord 5 perform well with 1080p footage. You might notice slight lag if you apply too many heavy VFX filters at once.
- Older/Budget Devices: These may struggle with previewing high-resolution files. Users should stick to 720p editing to maintain a smooth experience.
Screen Size Considerations
While VivaCut works on all Android phones, screen size matters. * Phablets: Large phones provide enough space for basic cutting and social media edits.
- Tablets: This is where VivaCut shines. A tablet offers a much larger timeline view. This makes precise “masking” and “keyframing” much easier.
Using a tablet allows for better accuracy. You can see more layers at once without scrolling constantly. If you plan to do professional work, a larger screen is a significant advantage.
VivaCut for Android Step-by-Step: How to Edit a Short Video
Mastering mobile video editing doesn’t have to be complicated. VivaCut for Android offers professional-grade tools in a mobile interface. Whether you are making a TikTok or a cinematic short, this guide will help you create a polished video from scratch.
Getting Started: Import Your Media
First, you need to bring your raw files into the app. VivaCut makes this process straightforward.
- Open the app and tap on the Create button.
- Select the videos or images you want to use from your gallery.
- Tap Add to bring them into your project.
- Import your background music or voiceover by tapping the Music tab.
Structure Your Story: Arrange Clips
Once your files are on the timeline, you need to organize them. A good flow is the secret to keeping your viewers engaged.
- Split: Move the playhead to a specific spot and use the split tool to cut a clip in two.
- Trim: Drag the edges of a clip to remove unwanted footage from the beginning or end.
- Duplicate: If you need a specific shot to repeat, use the duplicate feature to copy it instantly.
- Reorder: Long-press a clip and drag it to a new position on the timeline.
Enhance the Flow: Add Transitions
Sudden jumps between clips can feel jarring. Transitions help your video feel like a single, cohesive story.
To add them, look for the small square icon between your clips. Tap it to open the transition menu. Choose a subtle Dissolve for a professional look, or try a Glitch effect for high-energy content. Always keep your transitions consistent to maintain a clean aesthetic.
Add Motion: Keyframe Zoom and Pan
Keyframes allow you to animate your footage manually. This is perfect for creating a “Ken Burns” effect on still photos or following action in a video.
- Select a clip and tap the Keyframe icon (usually a diamond shape).
- Set a starting point at the beginning of the clip.
- Move further down the timeline and pinch the screen to zoom in or move the frame.
- The app will automatically animate the movement between these two points.
Pro Techniques: Green Screen Overlays
You can easily layer videos using the Overlay feature. This is how editors place subjects into entirely new environments.
First, tap Overlay and select a video with a solid green background. Next, find the Chroma Key tool. Use the picker to select the green color, then adjust the intensity until the background disappears. Now, your subject will appear to be floating over your main timeline footage.
Perfect the Sound: Adjust Audio Levels
Great visuals mean nothing if the audio is distracting. You must balance your background music with your primary audio.
Select your audio track and tap Volume. Lower the background music to around 20% if someone is speaking. If a clip has too much wind noise or background static, you can mute it entirely or use the fade-in/fade-out tools for a smoother experience.
Final Step: Export in High Quality
After you finish your masterpiece, it is time to share it with the world.
Click the Export button in the top right corner. Choose 1080p for a balance of quality and file size, or select 4K if you want the highest possible resolution. Wait for the rendering process to finish before closing the app. Your video is now ready for social media!
VivaCut Pricing & Subscription Models
VivaCut is a powerful video editing app for Android that caters to both hobbyists and social media pros. Whether you are cutting a quick TikTok or producing a cinematic masterpiece, understanding the costs helps you choose the right path.
The Free Tier: Getting Started
The free version of VivaCut offers a robust set of tools, but it comes with specific limitations. You can access basic editing features, such as splitting, trimming, and adding music. However, your creative freedom has a few “catches.”
- The Watermark: All videos exported in the free version include a VivaCut watermark.
- Export Limits: You are generally limited to 720p resolution. High-definition exports like 1080p or 4K are locked.
- Asset Restrictions: Many premium transitions, visual effects, and filters remain behind a paywall.
- Ad Presence: You will encounter ads while using the app and during the export process.
Subscription Models and Costs
If you want to unlock the full potential of the app, VivaCut offers “Pro” memberships. These plans remove all restrictions and provide a smoother editing experience.
- Monthly Subscription: This usually costs around $6.99 to $9.99 per month. It is a great choice for short-term projects or testing the premium features.
- Yearly Subscription: This is the most popular choice, often priced at approximately $35.99 to $39.99 per year. Choosing the annual plan usually saves you over 50% compared to the monthly rate.
- Lifetime Purchase: VivaCut occasionally offers a one-time “Lifetime” purchase for roughly $50.00 to $60.00. This allows you to pay once and own the Pro features forever.
Note: Prices may vary slightly depending on your region and current promotional offers in the Google Play Store.
Is the Pro Subscription Worth It?
Choosing between the free and paid versions depends entirely on your goals as a creator.
For the Casual Creator
If you only edit videos for friends or family, the free version might suffice. However, the watermark can be distracting. If you value a clean look but don’t edit often, consider a single monthly subscription for a specific event, then cancel it afterward.
For the Professional or Influencer
For serious creators, the Pro subscription is a vital investment. Professionalism requires high-quality output, and the Pro version delivers several key advantages:
- No Watermarks: Your brand stays front and center without third-party logos.
- Ultra HD Exporting: You can export in 4K, which is essential for YouTube and high-end Instagram Reels.
- Keyframe Animation: You gain access to advanced tools that allow for custom object movement.
- Massive Library: You get unlimited access to the latest trending effects and high-quality stock music.
Final Verdict
VivaCut Pro transforms the app from a simple mobile editor into a professional-grade workstation. While the free version is a generous way to learn the interface, the Yearly Subscription offers the best balance of value and features for most active creators. If you plan on using the app for more than two years, the Lifetime Purchase is the smartest financial move.
Tips to Get the Most Out of VivaCut on Android
Getting the most out of VivaCut on Android requires more than just basic trimming. This powerful mobile editor offers professional-grade features that can transform your videos into cinematic masterpieces.
Follow these practical tips to streamline your workflow and enhance your final results.
Optimize Your Storage for 4K
High-resolution editing demands significant resources. If you plan to export in 4K, your phone’s internal memory can fill up quickly.
- Switch to an SD Card: Go to your app settings and set your export path to high-speed external storage.
- Maintain Speed: Use a Class 10 or UHS-3 microSD card to prevent lag during the rendering process.
- Clear Cache Regularly: VivaCut stores temporary files while you work. Delete these often to keep the app running smoothly.
Master Keyframe Easing
Static movement looks robotic. If you want your overlays or text to move naturally, you must learn keyframe easing.
- Set Your Points: Place your start and end keyframes on the timeline.
- Access the Curves: Open the “Graph” or “Easing” menu between the two points.
- Apply “Ease In” or “Ease Out”: This causes the motion to start slow and speed up, or slow down before stopping.
- Create Flow: Easing adds a professional “bounce” or “slide” effect that sets high-quality edits apart from amateur ones.
Enhance Your Audio Quality
While VivaCut handles video beautifully, its audio tools are somewhat limited. For a truly immersive experience, you should pair it with a dedicated mobile audio editor.
- Record Separately: Use a specialized voice recorder app to capture clean dialogue.
- Process First: Clean up background noise or add compression in an external audio app.
- Import and Sync: Bring the polished audio file back into VivaCut.
- Layer Sounds: Use multiple audio tracks to balance background music, sound effects, and voiceovers independently.
Save Your Custom Presets
Consistency is the key to a strong visual brand. Instead of recreating the same look for every video, use presets to save time.
- Save Color Grades: Once you find the perfect filter and adjustment settings, save them as a custom filter.
- Reuse Text Styles: Keep your font choice, shadow depth, and animations consistent by saving them to your library.
- Batch Editing: Apply your saved presets to new clips with a single tap. This shortcut ensures your YouTube channel or social media feed looks professional and cohesive.
By applying these advanced techniques, you turn VivaCut from a simple trimmer into a robust production studio. Focus on smooth motion, high-quality sound, and an organized workflow to create content that stands out.
VivaCut for Android: Key Limits
VivaCut is a powerful mobile video editor, but it has specific boundaries you should know. Understanding these limitations helps you decide if it fits your creative workflow.
Hardware and Performance Needs
VivaCut demands significant power from your device. While basic apps run on older hardware, this professional-grade tool requires a modern engine.
- RAM Requirements: You should have at least 4GB of RAM for a smooth experience.
- Processing Power: High-resolution exports like 4K need a fast chipset.
- Storage Space: Complex projects create large cache files quickly.
If your phone has low memory, the app may lag. You might experience crashes during heavy multi-layer editing. Always close background apps before you start a new project.
The Lack of Desktop Integration
One major hurdle for professional editors is the lack of cross-platform syncing. Unlike competitors like CapCut, VivaCut lives primarily on your mobile device.
- No Direct Sync: You cannot start an edit on your phone and finish it on a PC.
- Workflow Gaps: Moving files requires manual transfers via cloud storage or cables.
- Static Workspace: Your project files stay locked to the Android file system.
This limitation means you are tethered to a small screen. It makes long-form editing or precise mouse-controlled adjustments much harder to achieve.
Cost of Premium Features
While the app is free to download, the best tools often sit behind a paywall. This can interrupt your creative flow if you are on a budget.
- In-App Purchases: Many trending transitions and cinematic filters require a Pro subscription.
- Complex Effects: Advanced “VFX” and green screen precision tools are often locked.
- Watermarks: The free version usually applies a watermark to your finished work.
Conclusion
VivaCut offers incredible tools for Android creators. However, you must navigate its hardware demands and the lack of a desktop companion. If you have a powerful phone and don’t mind staying mobile, it remains a top-tier choice. Be prepared to invest in the Pro version to unlock its full creative potential.
Master Social Media Videos with VivaCut for Android
Creating professional-grade videos no longer requires a bulky desktop setup. VivaCut for Android provides a robust suite of creative tools designed specifically for social media creators. Whether you are building a brand or sharing your life, these features help you stand out.
Master Stunning VFX and Transitions
Visual appeal is the heartbeat of viral content. VivaCut offers a massive library of over 300+ trendy effects that give your footage a high-end look instantly.
- Glitch and VHS: Add a nostalgic or edgy retro vibe to your clips.
- RGB Effects: Create trippy, colorful distortions that pop on mobile screens.
- Cinematic Transitions: Move between scenes smoothly with professional-grade wipes and fades.
By using these tools, you transform raw footage into a polished production. These effects help maintain viewer interest and increase your “watch time” on platforms like TikTok and Instagram.
Sync Your Edits with Music Markers
Great videos feel like they belong to the music. However, manual syncing can be frustrating and slow. The Music Marker tool simplifies this process by allowing you to map out the rhythm of your track.
- Add your track: Upload your chosen audio to the timeline.
- Mark the beat: Tap the marker tool to highlight every heavy bass hit or snare.
- Align your clips: Snap your video cuts directly to these markers.
Consequently, your video flows perfectly with the audio. This creates a satisfying, rhythmic experience for your audience.
Effortless Video Extraction
Sometimes, the perfect sound sits inside another video. Instead of searching for a separate MP3 file, you can use the Video Extraction feature.
This tool allows you to pull high-quality audio directly from any video in your gallery. First, select the video containing the sound you love. Then, VivaCut isolates the audio layer for you to use in your new project. As a result, you save time and keep your creative momentum going.
Capture Attention with Text and Stickers
Visual storytelling often needs a little extra context. VivaCut provides a variety of Text and Stickers to keep your viewers engaged.
- Custom Fonts: Choose from a wide range of styles to match your brand’s personality.
- Animated Text: Bring your words to life with motion presets that grab the eye.
- Unique Stickers: Use graphic elements to highlight key moments or add humor.
Using these elements helps you communicate clearly, even when viewers watch your videos with the sound off. Furthermore, well-placed text overlays can emphasize your call to action or summarize your main points effectively.
Frequently Asked Questions About VivaCut App For Android
What exactly is VivaCut?
VivaCut is a powerful video editor that focuses on multi-layer editing. It allows users to overlay videos, images, and text to create complex cinematic content. The app is widely used for creating social media clips, YouTube videos, and artistic short films.
Is VivaCut free to use?
Yes, the app follows a “freemium” model. You can download and use the basic editing tools for free. However, certain premium filters, effects, and transitions require a Pro subscription. The free version also includes a watermark on exported videos.
Does VivaCut support 4K resolution?
Absolutely. One of the strongest features of VivaCut is its ability to export videos in high definition. You can save your projects in 720p, 1080p, or even ultra-clear 4K. This ensures your content looks professional on any screen.
Can I use Chroma Key (Green Screen) in VivaCut?
Yes, the app includes a robust Chroma Key feature. This tool allows you to remove solid-colored backgrounds from your footage. Once you remove the background, you can replace it with any image or video layer you choose.
What is Multi-layer Timeline editing?
Multi-layer editing means you can stack multiple media files on top of each other. In VivaCut, you are not limited to a single track. You can add:
- Background video or images.
- Overlay clips for picture-in-picture effects.
- Soundtracks and voiceovers.
- Animated text and stickers.
Does the app support Keyframe Animation?
Yes, VivaCut provides precise keyframe tools. You can use keyframes to animate the movement, scale, and opacity of any layer. This is perfect for creating custom transitions or moving text across the screen.
Can I extract music from other videos?
This is a very popular feature in VivaCut. If you have a video with a song you love, you can import it and extract the audio. The app then places that audio on its own track for you to use in your new project.
What are the system requirements for Android?
VivaCut generally requires Android 7.0 or higher to run smoothly. Because video editing is a heavy task, the app performs best on devices with at least 4GB of RAM and a modern processor.
Why does the app sometimes lag or crash?
Video editing puts a lot of stress on your phone’s hardware. If you experience lagging, try the following steps:
- Close other apps running in the background.
- Clear the app cache in your phone settings.
- Lower the preview resolution while editing.
- Ensure you have enough free storage space on your device.
What are the benefits of VivaCut Pro?
Upgrading to the Pro version provides several advantages:
- No Watermark: You can export your videos without the VivaCut logo.
- Unlimited Access: You get every filter, effect, and transition in the library.
- Advanced Features: Some high-end tools are only available to subscribers.
- No Ads: The editing interface remains clean and free of interruptions.
Can I cancel my subscription at any time?
Yes, you manage your subscription through the Google Play Store. You can cancel at any time to prevent future charges. You will typically keep your Pro access until the current billing cycle ends.
How do I remove the watermark for free?
In the free version, the watermark is mandatory. Occasionally, the app may offer a “Watch an Ad” option to remove the watermark for a single export, but a subscription is the only permanent way to remove it.
Why can’t I export my video?
Export errors usually happen for two reasons: low storage space or incompatible file formats. First, check that your phone has enough room for the final file. Second, try exporting at a lower resolution (like 1080p instead of 4K) to see if the hardware can handle the process.
Can I use VivaCut without an internet connection?
You can perform basic edits while offline. However, you need an internet connection to download new effects, templates, or music from the VivaCut library. You also need a connection to verify your Pro subscription status.